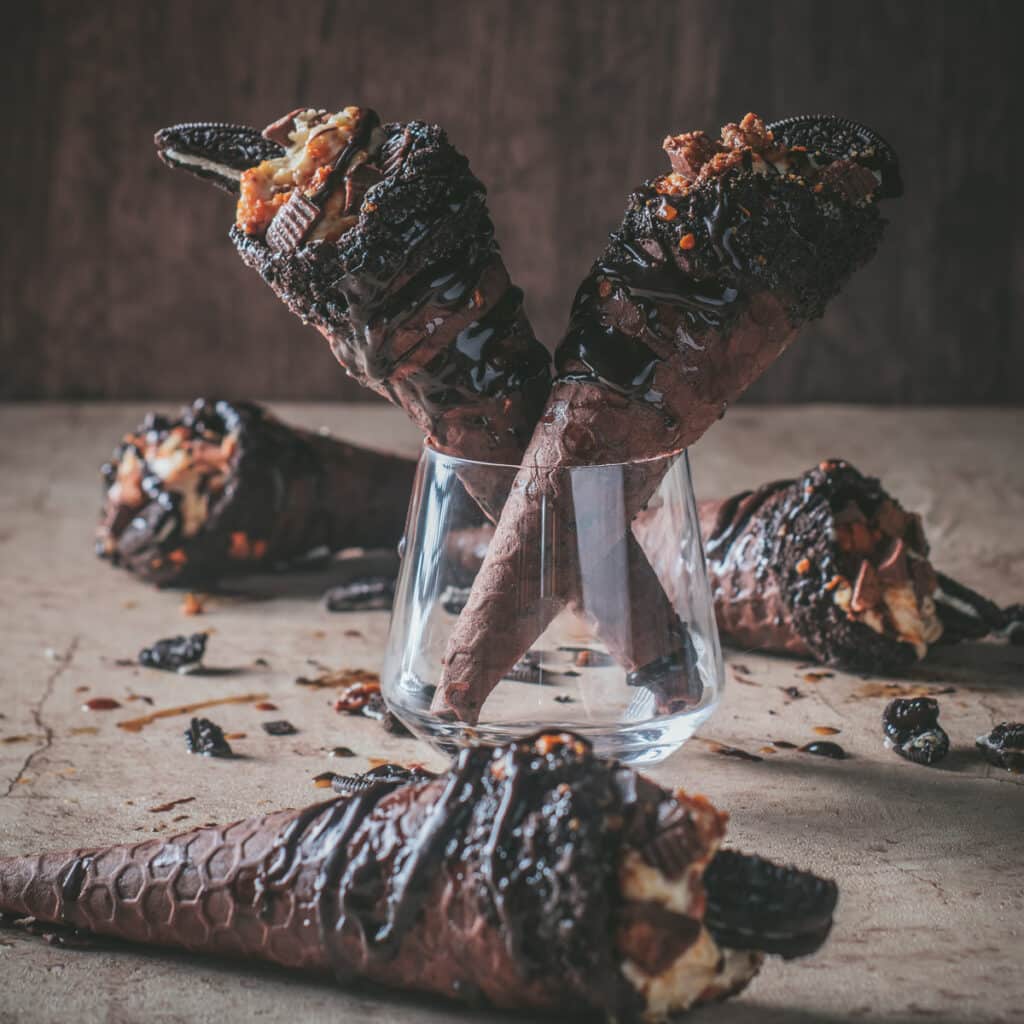
Y’all already know I love all things sweet and indulgent. These cheesecake waffle cones stuffed with a creamy no-bake filling are made with a crispy, homemade chocolate waffle cone, lined with a layer of melted chocolate and crushed oreos, filled to the brim with a creamy peanut cup and butterfinger cheesecake filling and crowned with more yummy toppings. And if you think this one is over the top, check out my oreo chocolate chip cookie cheesecake bars.

Table of Contents
Why Love this Recipe
- Homemade Chocolate Waffle Cones: There’s something incredibly satisfying about making your own waffle cones, especially when they’re chocolate-flavored!
- Creamy Cheesecake Filling: This no-bake filling is rich, velvety, and studded with chopped peanut butter cups and Butterfingers. It’s the stuff of dreams.
- Perfect Summer Treat: No oven required, making it the ideal dessert for those scorching summer days.
Ingredients Needed for Cheesecake Waffle Cones
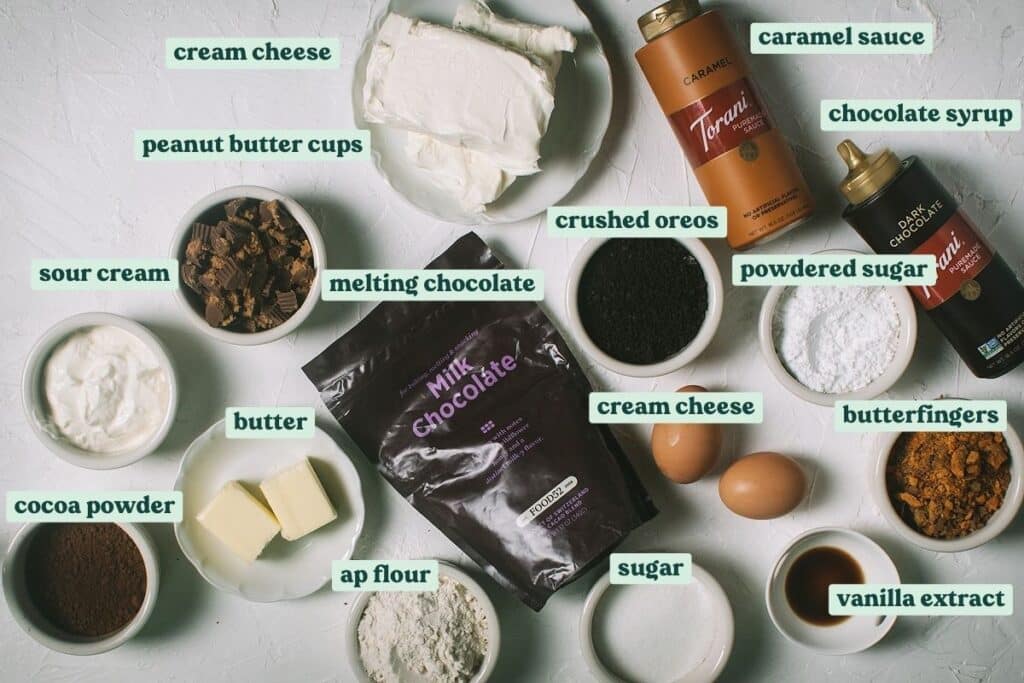
For the Waffle Cones
- Large Eggs: The binding agent for the waffle cone batter, giving it structure and helping to create a crispy texture.
- Granulated Sugar: Adds a hint of sweetness. You can also use brown sugar.
- Unsalted Butter: For richness, giving the cones a delicate, buttery flavor.
- Vanilla Extract: This is optional but does enhance the overall flavor.
- Unsweetened Cocoa Powder: This gives our waffle cones their chocolatey flavor along with mouth watering deep brown color.
- All-Purpose Flour: Be sure to spoon and level the flour so the batter isn’t too thick.
- Salt: A touch of salt balances everything out. Don’t leave this out.
- Melted Chocolate: The kind folks at Food52 sent me their melting milk chocolate discs. This stuff is amazingly delish. I used it for dipping of the cones. It not only acts as the “glue” to allow our crushed oreos to stick but also adds structure to keep the cones from becoming too soft.
- Crushed Oreos: These add a delightful crunch and flavor. Who can say no to oreos?
For the Filling
- Cream Cheese: The base of the no-bake cheesecake filling, provides a rich, creamy flavor. You can also use mascarpone.
- Sour Cream: Adds a slight tanginess to the filling, complementing the richness of the cream cheese.
- Powdered Sugar: Sweetens the filling and gives it a smooth texture.
- Vanilla Extract: Enhances the flavor of the filling, adding depth and aromatic sweetness.
- Chopped Peanut Butter Cups: These add a delightful combination of chocolate and peanut butter flavors to the filling.
- Chopped Butterfingers: Introduces a crunchy texture and a unique caramel-peanut flavor to the creamy filling.
Note: You can substitute the sour cream, cream cheese, powdered sugar and vanilla with a homemade stabilized whipped cream that features cream cheese and heavy whipping cream.
For Toppings
- Chocolate Syrup: A luscious drizzle that adds a rich chocolate flavor to the finished dessert.
- Caramel Syrup: Adds a sweet, buttery flavor that complements the chocolate.
- Chopped Peanut Butter Cups, Butterfingers and Oreos: More garnishes that additional crunch, enhancing the contrast between the creamy filling and the crispy cone.
How to Make Cheesecake Stuffed Waffle Cones
Make the Waffle Cones
In a medium mixing bowl, whisk together eggs and sugar. Pour in melted butter and vanilla. Whisk until well combined.
Sift in the cocoa powder, flour and salt, mixing until smooth.
Using a waffle cone maker, make waffles according to the manufacturer’s instructions. Depending on the size of your waffle iron, you’ll need 1-2 tablespoons of batter per cone.
Note: If you are using a stovetop waffle maker as I am, cook on medium-low heat for 1 minute, then flip and cook for another 30 seconds.
While the waffles are still warm, shape them into cones. If you do not have gloves to protect your hands from the heat, place the hot waffle on a clean towel or napkin, then position the cone roller (if using) on top. Using the towel/napkin and roller, shape the waffle into a cone shape. Hold it with the seam facing down until the cone becomes firm.
Allow the cones to cool slightly, then dip the cones upside down in melted chocolate to create a thin layer of chocolate, covering 2-3 inches of the top.
While chocolate is still warm, coat with Crushed oreos and allow to set in the fridge for 5-10 minutes.
Make the Cream Cheese Mixture
In a large bowl, whip cream cheese and sour cream until combined using a hand mixer or large whisk. Add sugar and vanilla and continue to whip until smooth. Fold in the chopped peanut butter cups and butterfingers.
Refrigerate the filling for about 30 minutes to slightly firm up.
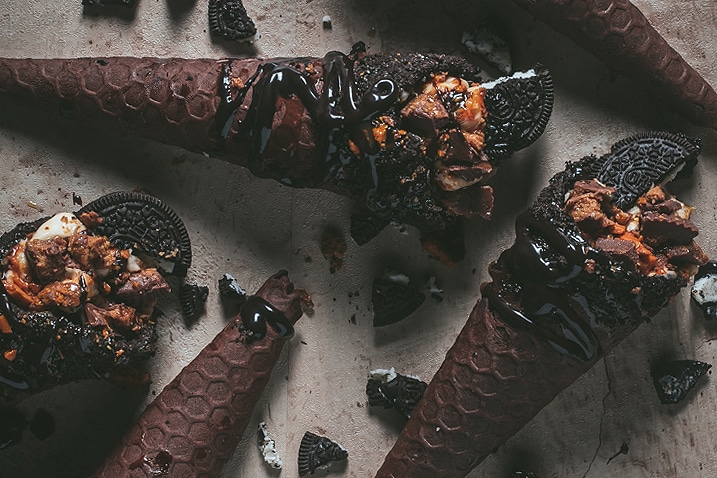
Assemble the Cones
Once the cream cheese filling has chilled for a bit, spoon or pipe the filling into the waffle cones. Drizzle chocolate syrup and caramel sauce over the cones and filling. Garnish with butterfingers, peanut butter cups and oreos. Enjoy!
Dee’s Tip
Use a Piping Bag or Pastry Bag: Using a piping bag ensures a neat and even distribution of the cheesecake filling. The piping bags I had on hand were not large enough to fit the peanut butter cup pieces, so I used a large ziptop bag and cut a hole just large enough to get the cups through.
How to Prevent Soft Waffle Cones
- Cool Properly: After making each cone, it’s crucial to let them cool properly on a wire rack. This allows air to circulate around the cone, helping it to dry out and become crisp.
- Store Correctly: Once cooled, store waffle cones in an airtight container. This will prevent any moisture from the air from softening the cones.
- Use Immediately: Since we’re filling the cone with something moist, we should enjoy it right away. The longer the moist filling sits in the cone, the soggier it will become.
- Coat the Inside: Before adding any filling, consider coating the inside of the cone with a thin layer of melted chocolate or white chocolate. Once it hardens, this creates a barrier that can help prevent the cone from getting soggy, especially from ice cream.
- Serve with a Holder: If you’re serving cones at a party or gathering, consider using cone holders. This prevents the bottom of the cone from sitting on a plate or napkin, where it can absorb moisture.
- Re-crisp in the Oven: If your unused, empty cones have lost some of their crispness, you can briefly reheat them in a preheated oven at 300°F for a few minutes.
Cheesecake Filling Variations
I love the versatility of this recipe. I landed on a chocolate peanut butter concoction but feel free to get creative and make a filling with your favorite ingredients. Here is some inspo to get you started:
Tropical:
- Filling: Cheesecake base mixed with coconut cream, diced mangoes and crushed pineapple.
- Toppings: Toasted coconut flakes and a drizzle of passion fruit syrup.
Strawberry Shortcake:
- Filling: Cheesecake base with fresh strawberries and a splash of lemon juice.
- Toppings: Fresh berries and a sprinkle of powdered sugar and strawberry crunch topping.
Coffee Lover’s:
- Filling: Coffee-infused cheesecake base with chocolate chips.
- Toppings: Cocoa powder and cacao nibs.
Caramel Apple:
- Filling: Cheesecake base with apple pie filling and caramel sauce.
- Toppings: Crumbled pie crust and a sprinkle of cinnamon.
Lemon Meringue:
- Filling: Cheesecake base swirled with lemon curd and crushed meringue cookies.
- Toppings: Whipped cream, golden oreos and lemon zest.
Banana Nut Crunch:
- Filling: Cheesecake base combined with banana slices and crushed walnuts.
- Toppings: Caramel drizzle and a sprinkle of cinnamon.
S’mores Galore:
- Filling: Cheesecake base layered with marshmallow fluff, crushed graham crackers, and chocolate chunks.
- Toppings: Toasted mini marshmallows and a drizzle of chocolate syrup.
Red Velvet Cheesecake:
- Filling: Cheesecake base mixed with red velvet cake crumbs.
- Toppings: White chocolate shavings and a drizzle of raspberry sauce.
Storage Instructions
Store Immediately:
First, I suggest you only make enough cones for everyone to consume right away because the cones tend to become softer over time. If you do end up with leftovers, place them in the fridge in an airtight container as soon as possible.
Layer with Parchment Paper:
If you’re stacking the cones in a container, place a sheet of parchment paper between each layer to prevent them from sticking to each other.
Freezing:
First, freeze each cone individually on a tray to set the filling. Once frozen, transfer them to an airtight container, separating layers with parchment paper. They can be stored in the freezer for up to a month. To serve, thaw in the refrigerator for several hours. Note, the cone will be a bit soft.
Avoiding Sogginess:
If you’re concerned about the cones becoming soggy, consider storing the cheesecake filling and waffle cones separately. When you’re ready to serve, you can then fill the cones with the cheesecake mixture.
Re-crisping:
If the waffle cones have lost some of their crispness during storage, you can briefly reheat them in a preheated oven at 300°F for about 5 minutes. Do this before filling them.
Frequently Asked Questions
Can I use dark chocolate instead of melted chocolate?
Absolutely! Dark chocolate will add a richer flavor to your cones.
Can I add other toppings?
Of course! Feel free to get creative with fresh fruit, cookie crumbles, or any of your favorite toppings. See above for more topping ideas under variations.
Can I use store-bought waffle cones instead of making them from scratch?
Yes, you can! However, making them from scratch ensures a richer chocolate flavor and a fresher taste. I’ve also had a hard time finding chocolate cones in my local grocery stores.
What kind of chocolate should I use for the waffle cone?
Use a high-quality cocoa powder for the best flavor. Here is my favorite.
Can I use a different filling other than cheesecake?
Absolutely! I encourage you to experiment with other fillings. You can fill with chocolate mousse, whipped cream and cake. Or keep in basic fill with ice cream. I mean they are technically ice cream cones!
Can I make the waffle cones ahead of time?
Kind of. You can prep your toppings and make the filling ahead of time but I do suggest making the waffle cones closer to when you’re ready to serve so they are enjoyed hard and crispy.
Biting into one of these cheesecake waffle cones is a delight. The combination of the crispy chocolate cone, the velvety cheesecake filling, and the gourmet toppings is a match made in dessert heaven. Perfect for those days when you’re in the mood for something indulgent but don’t feel like turning on the oven. If you try out this recipe, I’d love to see your creations! Share your photos and tag @gimmefromscratch. Until then, happy eating and stay sweet!

Cheesecake Waffle Cones with Reese’s Peanut Butter Cups, Oreos and Butterfingers
Ingredients
For the Waffles
- 2 large eggs
- 1/2 cup granulated sugar
- 6 tbsp unsalted butter, melted
- 1 tsp vanilla extract
- 1/4 cup unsweetened cocoa powder
- 3/4 cup all-purpose flour
- 1/4 tsp salt
- 1/2 cup chocolate, melted
- 1/2 cup oreos, crushed
For the Filling
- 2 8oz packages cream cheese, softened
- 1 cup sour cream , stabilized whipped cream
- 1 cup powdered sugar
- 1 cup peanut butter cups, chopped
- 1 cup butterfingers, chopped
- 1 tsp vanilla extract
For Assembly
- chocolate syrup
- caramel sauce
- peanut butter cups, chopped
- butterfingers, chopped
- oreos, halved
Instructions
Make the Waffle Cones
- In a medium bowl, whisk together eggs and sugar. Pour in melted butter and vanilla. Whisk until well combined.
- Sift in the cocoa powder, flour and salt, mixing until smooth.
- Using a waffle cone maker, make waffles according the manufacturer instructions. Depending on the size of your waffle iron, you’ll need 1-2 tablespoons of batter per cone.
- Note: If you are using a stovetop waffle maker as I am, cook on medium-low heat for 1 minute, then flip and cook for another 30 seconds.
- While the waffles are still warm, shape them into cones. If you do not have gloves to protect your hands from the heat, place the hot waffle on a clean towel or napkin, then position the cone roller (if using) on top. Using the towel/napkin and roller, shape the waffle into a cone shape. Hold it with the seam facing down until the cone becomes firm.
- Allow the cones to cool slightly, then dip the cones upside down in melted chocolate, covering 2-3 inches of the top.
- While chocolate is still warm, coat with Crushed oreos and allow to set in the fridge for 5-10 minutes.
Make the Filling
- In a medium size bowl, whip cream cheese and sour cream until combined. Add sugar and vanilla and continue to whip until smooth. Fold in the chopped peanut butter cups and butterfingers.
- Refrigerate the filling for about 30 minutes to slightly firm up.
Assemble the Cone
- Once the filling has chilled for a bit, spoon or pipe the filling into the waffle cones. Drizzle chocolate syrup and caramel sauce over the cones and filling. Garnish with butterfingers, peanut butter cups and oreos. Enjoy!


10 Responses
What a delightful and fun treat! I also added some crushed up Twix bars to it since I have them at hand. The kids love it!
Oh my, these were a real treat. Chocolate waffle cones came out so well and we loved the cheesecake filling.
Wow these were amazing! I used store bought waffle cones and they came out great. Love all of the different filling variations you listed, so we are definitely going to make more!
Wow, these sounds delicious and look so fun to make! Would make a great dessert! Thanks for the recipe share!
These are just pure decadence in a wonderful handheld cone! love the filling and the chocolate cone wonderful!
This is a great summer treat! 😋 ❤️ 😍
Oh man! What a great idea for a dessert! I am loving that cheesecake filling and all the topping options. 🙂
What a decadent summer treat. These cheesecake waffle cones are now a firm family favourite!
This looks mouthwateringly tasty and combines alot of my favorite desserts in one. Thanks for sharing
Wow, I love this! it looks so yummy and I just can’t wait to try it out. Thank you for sharing this fantastic recipe.
Wow! This cheesecake waffle cone looks amazingly delicious and very yummy! It gives an awesome vibe, a perfect treat that everyone will gonna love and enjoy! Thanks for this! Loved it!